I get it—building a website can feel intimidating at first. When I created my very first site over five years ago, I had zero experience with web development. I spent countless hours digging through “how-to” tutorials, only to realize most of them assumed I already knew coding languages like HTML or CSS. Honestly, it was overwhelming.
Fast forward to today, I’ve built and managed more than 50 websites, and here’s what I’ve learned: you don’t need to be a developer to get started. With the right tools, creating a professional website is much simpler than most people think—and you can do it without touching a single line of code.
In 2026, building a website is easier than ever. Thanks to modern tools, the process is so automated that whether you’re 20 or 80, you can create a stunning, functional site in no time.
Take my own site as an example—I built it in under 30 minutes using WordPress, a free yet incredibly powerful platform. No coding, no headaches, no endless tech jargon.
In this guide, I’ll walk you step by step through the same process so you can launch your own website today. Still not convinced? I’ve written another article, “9 Reasons Why You Should Create a Website Today,” that might just give you the push you need.
P.S. If you hit a roadblock along the way, don’t worry. Reach out—I’m always happy to help.
So, are you ready to get your website online in less than half an hour? Grab a coffee, settle in, and let’s get started.
Step 1: Choose the Right Type of Website
Before you dive into design or tools, take a moment to think about why you’re creating a website. Every site serves a purpose, and getting clear on yours will guide every decision that follows.
Ask yourself: What do I want this website to do for me? Is it simply a place to share your thoughts? A platform to showcase your work? Or maybe an online store to sell products worldwide?
Here are some of the most common website types to consider:
- Personal website
- Portfolio website
- Business/service website
- Blog
- E-commerce

Source: Upmetrics, Tidio (Oct 2025)
For example, if your goal is to provide professional services, a portfolio or service-based website makes the most sense. On the other hand, if you’re planning to sell products—whether it’s handmade crafts, digital downloads, or even an online course—an e-commerce website will serve you best.
When I built my very first site, my passion was classic cars. Naturally, I went with a blog, where I could share resources, tips, and stories with other enthusiasts. That experience taught me something important: it’s so much easier to create and maintain a website when it actually aligns with your goals and interests.
The bottom line? Don’t force yourself into building a website just because it looks trendy. Build one that matches your purpose. And if you already have experience in a certain industry, that’s even better—you’ll have a clearer idea of what type of site will support your goals, whether it’s attracting clients, selling products, or sharing knowledge.
Step 2: Select a Website Platform – Free or Paid?
Once you’ve decided what kind of website you want, the next step is choosing where to build it. And here’s where things can get confusing. Some platforms advertise themselves as “free,” but once you try to launch your site, you realize you need to pay for upgrades just to unlock essential features.
This is exactly why WordPress has remained the go-to choice for beginners and professionals alike. It’s reliable, flexible, and yes—free to start. In fact, as of 2026, about 43% of all websites on the internet are powered by WordPress. Even more impressive, it holds a 62.7% share of the global CMS (content management system) market. That’s not just popular—it’s dominant.
Here’s why I recommend WordPress for anyone starting out:
- You get access to thousands of layouts and free themes to match your style.
- Creating and managing pages is simple—you can add text, images, videos, or even entire galleries without knowing a single line of code.
- Organizing content is a breeze. You can use categories, tags, and custom menus to make your site easy to navigate.
- Engagement comes built-in. Visitors can leave comments, share posts, and interact with your content.
- And the best part? As your site grows, WordPress grows with you. From simple blogs to full-blown online stores, it can handle it all.

Source: W3Techs, BuiltWith (Oct 2025)
Free Isn’t Really Free…
Sure, you can spin up a free website using platforms like Wix or Canva. It sounds tempting, right? But here’s the catch: “free” usually comes with strings attached. Let me break it down.
- You don’t get your own domain name.
Instead of something clean and professional like mywebsite.com, you’ll be stuck with a clunky subdomain—something like mywebsite.wix.com. It doesn’t exactly scream credibility, especially if you’re running a business or personal brand. - Design options are very limited.
Most free plans lock you into basic templates with little room for customization. Want that sleek layout or a plugin to add functionality? Get ready to pull out your wallet. Costs can pile up quickly, often more than you’d expect. - You don’t truly own your site.
This one’s big. When your website lives on someone else’s platform, you’re essentially renting space. If the platform decides you’ve violated a policy (which happens more often than you’d think),—or just changes direction—you could lose your entire site overnight. All your hard work, gone. - Monetization is restricted.
Thinking about selling products, running ads, or building a membership site? Free platforms won’t give you the freedom to do it properly. Their rules and limitations often make it nearly impossible to scale or turn your website into a real business.
In short, free platforms are fine for experimenting, but if you’re serious about your online presence, they can quickly become a roadblock. That’s why investing in a reliable platform (like WordPress, paired with your own domain and hosting) pays off in the long run.
What Does It Cost to Start a Self-Hosted Website on Your Own Domain?
Not much. You’ll need a domain name, which costs around $10-$15 a year, and web hosting (a service that connects your website to the internet), which starts at about $3-$9 a month (less than a movie ticket).
The best part about going the self-hosted route is flexibility. You’re not tied down to one provider forever. If you change your mind, you can cancel at any time (most hosts even offer a 30-day money-back guarantee). And if your site grows and you need more resources, upgrading is as simple as a few clicks.
Step 3: Pick a Domain, Get Hosting, and Set Up Your Site
If you’ve decided to go with a self-hosted website on your own domain—smart choice. Finding a great domain name can take some time, but it’s worth the effort.
I suggest picking something brandable and easy to remember.
For example, if you’re planning to start an automotive website, choosing a domain like www.classiccars2024.com or www.best-car-website.com might not be the best idea.
Why?
People simply cannot remember long domain names, and when they want to return to your website, they’re likely to forget it.
It’s much better to choose something memorable, such as www.TopGear.com, www.MotorTrend.com, or something similar. Alternatively, you could use your own name as the domain, like www.FirstnameLastname.com.
In short, your domain name should be:
- Catchy
- Easy to remember
- Unique
- Avoid numbers
Where to Get a Domain Name and Website Hosting
I usually suggest getting both your domain and hosting from the same provider. It saves time, money, and avoids the hassle of managing everything separately.
Over the years, while creating and managing websites, I’ve tried several hosting companies—including some of the big, well-known names. Honestly, I wasn’t completely satisfied. Customer support often felt unprofessional, response times were slow, and sometimes my site would go offline for hours without proper help.
One of the most reliable providers I’ve found—and the one I currently use—is Hostinger (our partner). They even include a free domain name for the first year.
Their plans are affordable compared to others, and their customer support is available 24/7 via email and chat. Hostinger is also beginner-friendly thanks to their One-Click Installation feature, which makes setting up a WordPress website incredibly easy. Just a few clicks, and your self-hosted site on your own domain is ready to go.
Of course, you can use any other hosting company, and I’ve included a tutorial on how to install your website manually as well. If you decide to go with a different hosting provider, make sure they offer enough bandwidth and disk space so that you can install WordPress with the minimum requirements. This will help you avoid problems later on.
You have two options to set up your website:
- A. With “One-Click Installation” using Hostinger (free domain included)
- B. Manually to any web host
The One-Click Installation is ideal for beginners or anyone creating their first website. If you’re more experienced with the internet and computers, you might prefer the manual installation tutorial.
Whichever method you choose, you’ll have your website up and running in no time.
A) How to Set Up a Website Using Hostinger (For Beginners)
You can get your domain name and web hosting from Hostinger.
I chose them for this tutorial due to their simple setup and affordable pricing.
I also managed to get a discount for anyone reading this guide. If you visit Hostinger through my site (using this link), the discount should be applied automatically (You will get hosting for $2.78 per month instead of $2.99).
P.S. Make sure you follow the screenshots below in order to get the cheapest plan available.
P.P.S. If you follow the steps below, the entire registration and website setup process should not take more than a few minutes.
Step 1: Choose your web hosting plan
First you need to go to www.Hostinger.com and choose your web hosting plan.
Hostinger offers three main hosting plans. In this guide, we’ve opted for the “Premium” 12-month hosting plan that comes with a one-year free domain.
The Premium plan is a good choice if you’re just starting out and don’t yet have a large volume of inbound website traffic.

Note: If needed, you can always upgrade or downgrade your plan.
2. Choose your hosting length
The next step is to choose your hosting plan duration and complete your registration.

Choose the 12-month plan:
In my case, I opted for the one-year plan at $33.37.
It renews at $9.99, so if you want to avoid the renewal at that rate, you may want to consider choosing a longer-term plan.

After selecting your plan, you’ll get an overview of your order and the available payment methods.
Next, fill out all the required information, such as your first and last name, address, email, and don’t forget to use our coupon code WEBSITESETUP.
Before you enter your payment information, double-check all the above criteria. If everything is correct, click Submit Secure Payment.
3. Choose a domain name (free)
After completing the purchase, the next stage is to connect your new domain name with Hostinger or register a free domain name (for the first year) directly with them.
You’ll be prompted with three different options to name your website during the hosting setup process. If you’re not sure about the domain name yet, there’s an option to skip this step.
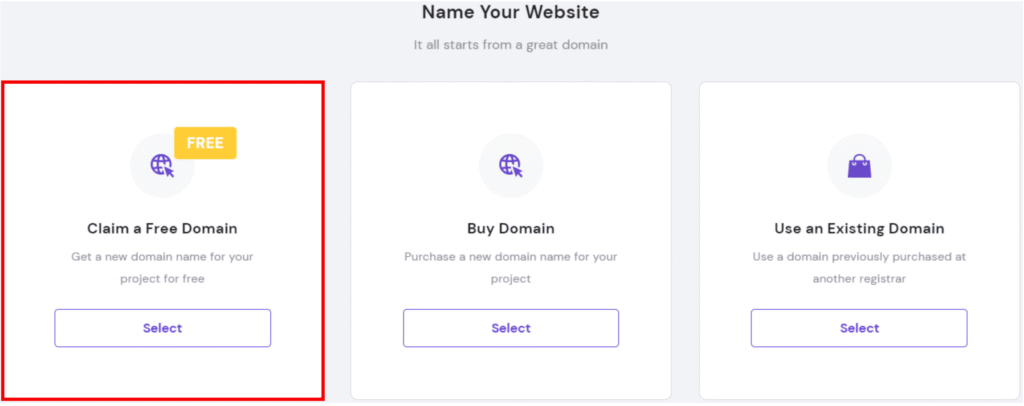
If you already have a domain name—don’t worry, you can still integrate it with Hostinger.
You can otherwise claim your free domain (free for one year). If you skipped the option or missed the chance to claim your free domain, don’t worry—you can access the option later through the members area.

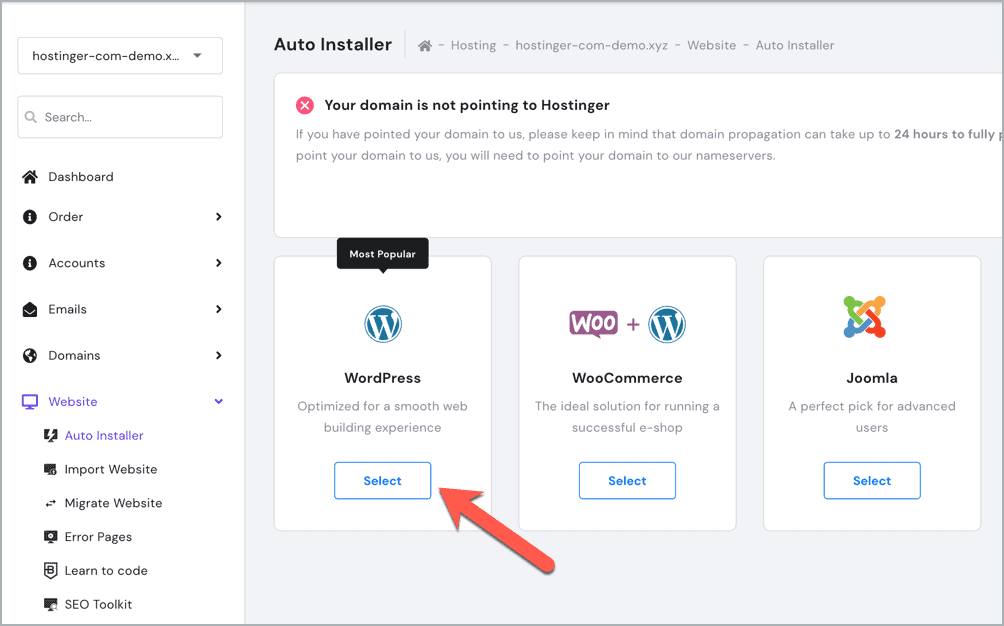
4. Add a WordPess website to your hosting plan (free)
In the Websites section of your hosting dashboard, click the Add Website button for the hosting plan you want to use. Then, select WordPress as your website platform.
5. Create your WordPress login details
Next, you’ll need to set up your WordPress admin credentials:
- Choose your preferred language for the WordPress admin panel.
- Enter an administrator email address.
- Create or generate a strong password for security.
6. Select your website type
Choose the category that best fits your website—whether it’s an online store, blog, portfolio, business site, or something else. This helps personalize the setup process.
Alternatively, you can opt to create a blank site and skip the personalization steps.
That’s it!
B) How to Manually Set Up a Website on Any Web Hosting (Advanced)
This guide is intended for those who are already familiar with hosting. But, it’s especially helpful for anyone who hasn’t used Hostinger or for those who are using another web host that doesn’t offer instant WordPress installations for free.
Step 1: Download WordPress
Start by downloading the latest version of WordPress from the official WordPress.org website. Click on the Get WordPress button to download a ZIP file containing all the necessary WordPress components.
Step 2: Extract the WordPress Files
After downloading, extract the contents of the ZIP file to a folder on your computer. This will create a folder named “wordpress” that holds all the WordPress files and directories.
Step 3: Connect to Your Web Host
To do this, you’ll need an active web hosting subscription that meets the minimum WordPress requirements. Next, open your FTP client (for example, Filezilla) and connect to your web host using your SFTP credentials, which include the hostname, username, and password. These details are typically found in your hosting account’s control panel or welcome email.
Step 4: Upload the WordPress Files
Once connected, navigate to the directory on your server where you want to install WordPress. It’s usually the “public_html” or “www” folder. Drag and drop the contents of the “wordpress” folder from your computer to the remote server. The upload process may take a few minutes depending on your internet connection and file size.
Step 5: Create a MySQL Database
To use WordPress, you’ll need to create a MySQL database. Most hosting providers offer tools like cPanel’s MySQL Database Wizard to simplify this process.
Follow the prompts to create a new database, and note down the database name, username, and password for the next step.

Step 6: Run the WordPress Installer
Once the upload is complete, open your web browser and visit your domain name. This will start the WordPress installation process. When prompted, enter the database name, username, and password that you created earlier. Then, follow the instructions to complete the setup.

Step 7: Finalize the Installation
After entering your database details, click Submit to finish the installation. WordPress will then create the necessary database tables and configure your site.
This process may take a few minutes depending on your hosting account and internet speed.
Once the installation is complete, you’ll see a success message with a link to your new WordPress site. Click the link to visit your site and log in using the credentials you created during the setup.
Choose a Theme, Add Pages and Build Your Website
Congratulations! By now, you should have a fully functional website.
But don’t stop here—there’s still more to do!
Step 1: Login and choose your website theme (design)
Once you set up your WordPress website, you can log in from yourdomain.com/wp-admin/. Be sure to update “yourdomain.com” with the correct details.
After logging in, navigate to your WordPress dashboard and select Appearance from the left-hand menu.
Here, you can tweak your website’s theme, layout, colors, and fonts.
Essentially, every visual change you want to make on your website can be done through the Appearance page.

Once you choose the theme best-suited for you, click Install and then Activate. To help you choose, we’ve put together a list of the best free themes on WordPress.
Take your time to find the best theme for your website. Don’t worry if you choose something that you don’t like—you can always change it.
Step 2: Build your website structure
Once you have chosen a template, you need to create a structure and add the most important pages.
These are usually:
- Homepage
- About us
- Contact page — here, you can add your social links (Facebook page, Twitter, etc.)
- Our services/products
- Blog
- Gallery
- Testimonials/reviews
Do some brainstorming to determine which pages you need the most, and start from there. Make sure you include the most important pages in your header as well as your footer so visitors can access them easily site-wide.
If you’re unsure what your website should include, read this article about the 12 critical elements every site needs.
Step 3: Add pages and publish your content
A blank website without any pages or content isn’t interesting so to make the website accessible and compelling, we need to add some pages and blog posts.
To add a page to your WordPress site, navigate the left-hand menu of your admin dashboard. Then, go to Pages, and from there, click the Add New button.
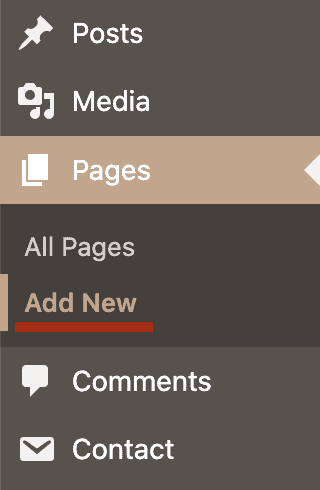
That will take you to the WordPress block editor.
If it’s your first time visiting this page, it will display a quick step-by-step tutorial on how it works and where certain functions are located.
It’s quite straightforward to navigate; everything is block-based, which means if you want to add an element to your page, you can choose the corresponding module or “block” from the menu, then add your content to it.
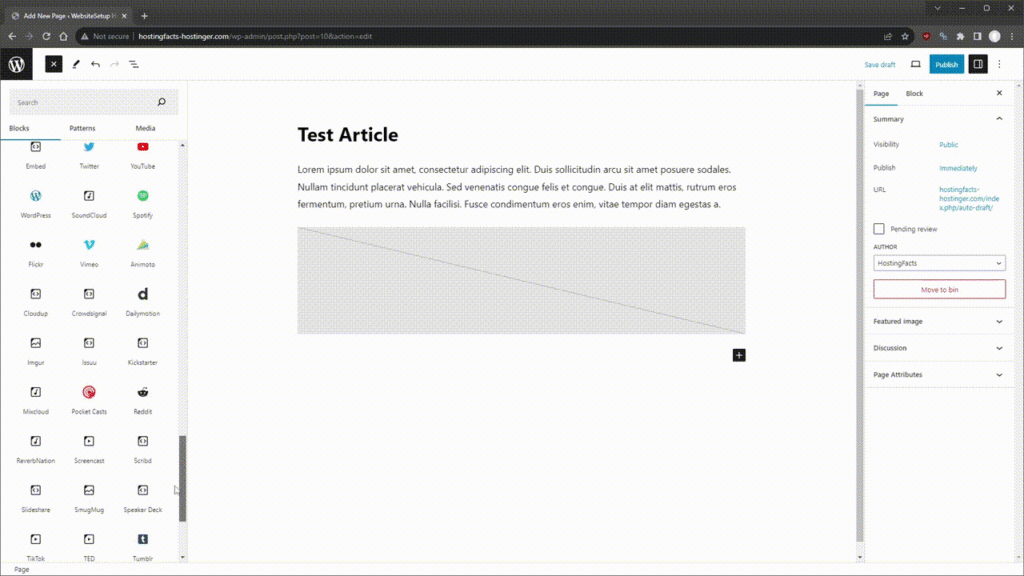
On the left in the content block section, there are multiple content options to choose from. Each serves a different purpose and adds a different visual element to the page.
Alternatively, the right-hand menu allows you to change some page-wide settings, like the author, the page’s permalink (URL), the featured image, and more.
On the top of the right-hand menu, you can click on the Block tab and customize the settings for each block you’ve selected on the page.
Once you’re happy with the page, you can make it public or private. The former will make the content visible to any visitor, while the latter means that it’s only visible to you from your website dashboard.Keeping your page private is a useful option to use when you’re still working on it.
There’s also an option to preview the changes you’ve made or to schedule a date and time for the page to be published.
Step 4: Organize website structure and navigation
Now that you’ve created the pages, you need to add them to the navigation (menu) bar.
That’s the menu located throughout your website that provides visitors with access to the rest of the content.
In WordPress, you can customize your navigation system by clicking Appearance in the left-hand column followed by Menus. Follow the directions on the page to create a new menu. After you’ve done that, you can start adding and organizing the pages in there.
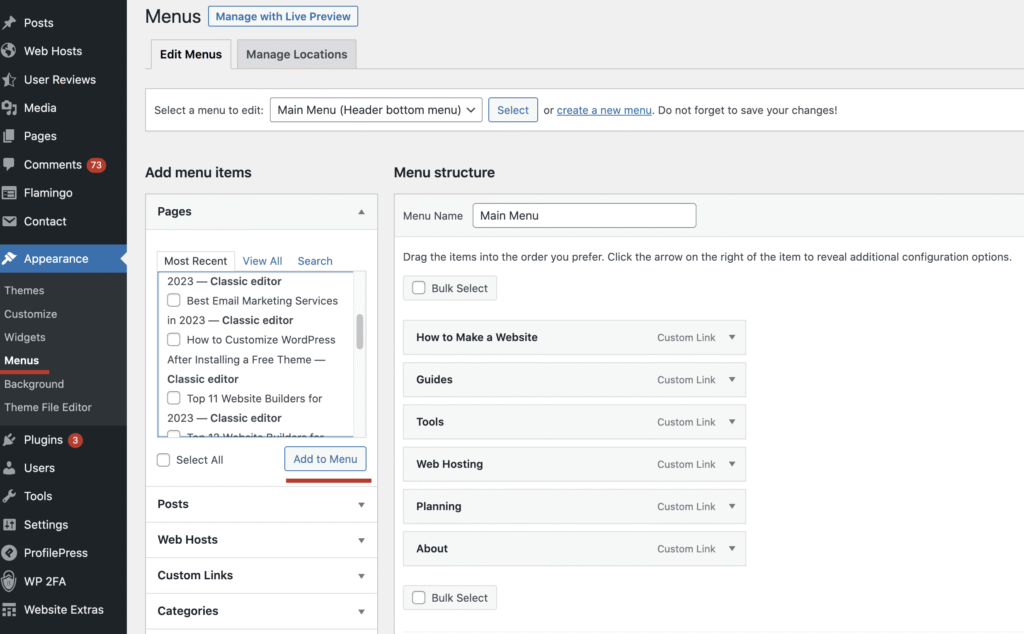
You can also create sub-items, meaning that pages will be revealed when users hover their mouse over them.
Step 5: Upload your logo and favicon
At this point, your website has content and structure, meaning you’re almost across the finish line. To wrap things up, you need to include a logo. You can also add a favicon if you want your logo to appear next to your website’s URL in your browser’s address bar. Both of these can be added through the Site Identity menu.
To access it, go to Appearance in the left-hand menu and click Customize, followed by the Site Identity option. Under the Logo section, click Select Logo and choose your logo file if you already uploaded it to the Media Library. Or, upload it now. Once you’ve done that, your logo will automatically appear on your website.
You can upload your favicon in the Site Identity menu under the Site Icon section.
You can create a favicon by using any of these free favicon generators. They can convert your logo so they fit the correct shape and size specifications.
Congratulations, Your Website is Ready
Well done! At this stage, your website should be up and running smoothly.
One more thing—you might want to connect your website to Google Search Console (GSC). The configuration process for this tool is straightforward and should take roughly 10 minutes.
That’s it!
P.S. If you found this guide helpful, I’d really appreciate it if you shared it. Your support means a lot!
P.P.S. If you used this guide to create a website, I’d love to see it! Feel free to email us at info@websitesetupai.com.
Read Our another Review: Livestorm Review: Best Browser-Based Webinar Software